A step by step guide to accessing a Windows Share from RISC OS.
Judging by recent comments on the comp.sys.acorn.networking usenet group, it seems there is a lack of documentation on how use the Lan Manager TCPIP client (referred to simply as ‘LanMan’ from this point forward) on a RISC OS computer to access a shared folder on a Windows computer (a “Windows Share”).
More specifically, the discussion concerned LanMan version 2.52, dated 9th August, 2015 – an updated version of the included in recent builds of RISC OS for newer hardware, which now copes with NTLM encrypted log-ins. Previous versions of LanMan supplied with the operating system were unable to handle this type of log-in, which have been a feature of Windows for several years.
This, therefore, is a quick step by step guide based on my own set up (RISC OS 5.23 and Windows 8) – it is what works for me and should, I hope, work for anyone using the same version of RISC OS (or greater) and any version of Windows for which this presents a problem – though depending on which version of Windows, and any peculiarities in its set up, some of the places things are found (and how they look) may differ from below!
Step 1: Turn on file and printer sharing
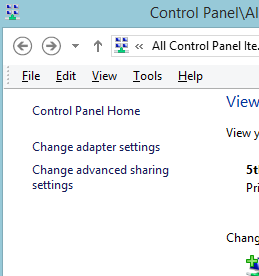
Load your Windows computer’s Control Panel, and run Network and Sharing Centre. The top left will probably look something like this:
If you click on “Change advanced sharing settings” you should then see a window which will allow you to “Change sharing options for different network profiles” as follows:
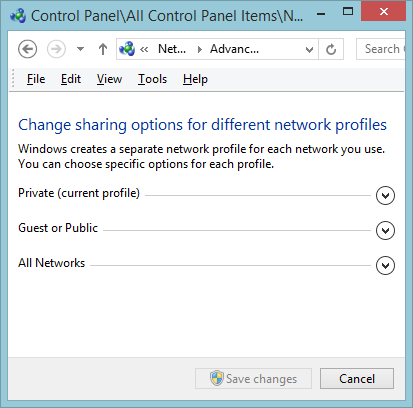
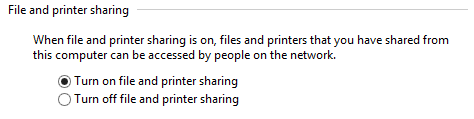
I’ve ‘collapsed’ all the profiles here to reduce the size of the window for the purposes of this post. Click on “Private (current profile)” to expand that section, then look for “File and printer sharing” and turn it on if it isn’t already. If you’ve had to turn it on, click on “Save changes” at the bottom.
You are now finished with the Network and Sharing Centre and Control Panel – close them.
Step 2: Share the folder you need to access from RISC OS
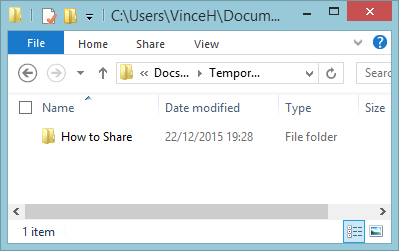
The next step is to tell Windows to share the folder you wish to access from RISC OS, so navigate to that folder from your usual starting point – put don’t open the folder itself; you simply need to be able to see it. For the purposes of this guide, I’m using a folder called “How to Share” which I’ve placed in a temporary location in my normal documents tree.
If you right-click on that folder, you should see a menu that looks something like this:
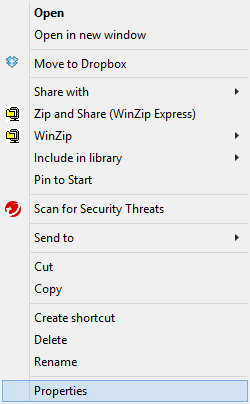
Click on ‘Properties’ at the bottom, and you should get a window that looks like this:
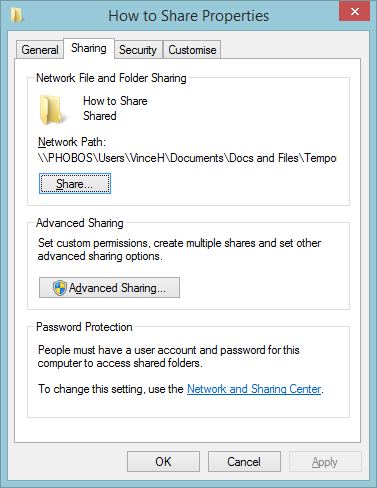
Notice that the “Network Path” described in this window shows the name of the computer (Phobos in my case), followed by the path to the folder you are sharing. This is because the shared folder doesn’t yet have a meaningful name. Click on “Advanced Sharing” to call up the following window:
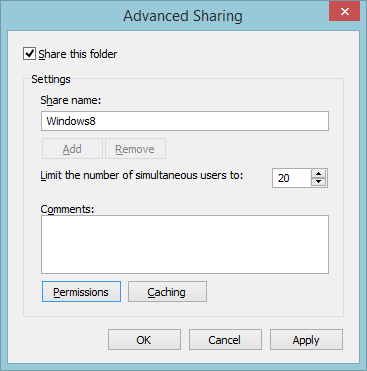
Tick the box at the top that says “Share this folder” and enter a suitable name for it in the “Share name” field. This is the name that the outside world – and in this case RISC OS – uses to find the folder on the Windows computer. Make it meaningful, but also simple – do not use any spaces. For this example, since I’m accessing a folder on a Windows 8 computer, I’ve called it Windows8.
Now click on ‘Permissions’ to get this window:
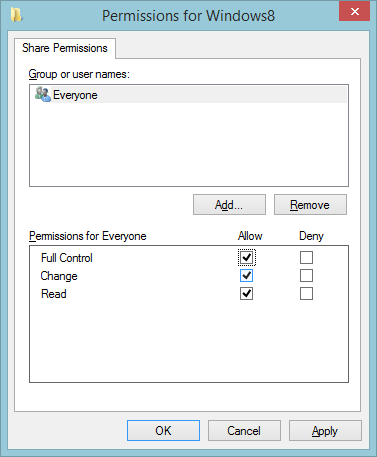
You will probably find that only ‘Read’ is ticked – but if you want to be able to write to the folder from RISC OS, tick “Full Control” – this will also tick ‘Change’ at the same time.
Now click on ‘Okay’ in the Permissions window, and again in the Advanced Sharing window. You will be back at the Sharing window, which will now look something like this:
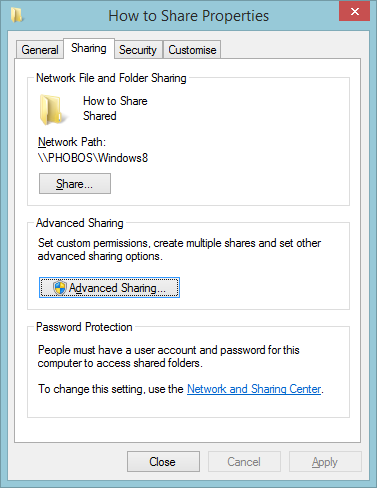
Notice that the “Network Path” is now much shorter – it now consists of the computer name (Phobos) and the name given to the shared folder (Windows8). Click on “Apply” and close this window – the shared folder is now set up.
Step 3: Accessing the folder from RISC OS
On your RISC OS computer, you need to run OmniClient (if it isn’t already running – you may, like me, have it run automatically as part of the computer’s boot sequence). Click with the Menu button over OmniClient’s iconbar icon and move the mouse over ‘Mounts’ then ‘Protocols’ so that the menu path looks like this:
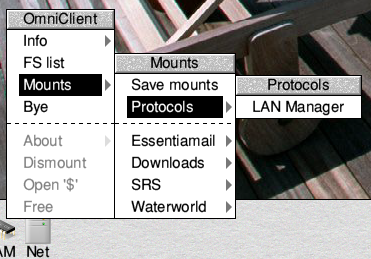
If you now click on “LAN Manager” you will get a window into which you must enter all the necessary information to access the shared folder:
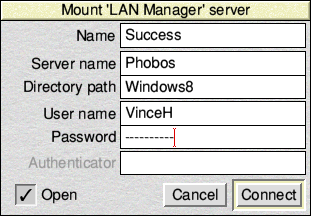
The “Server name” field should contain the name of the computer on which the folder resides – which for me, as explained above, is Phobos, and the “Directory path” field is the name given to the folder when sharing it on Windows. The topmost field, ‘Name’ is the name you wish the folder to appear as on the RISC OS iconbar and, since the above guide suggested giving the folder a meaningful name for sharing, it would make sense to use the same name here – but it doesn’t have to be.
The user name should be the user name with which you log-in on Windows, and the password should be the password you use for that log-in.
And finally, if ‘Open’ is ticked, when you click ‘Connect’ a directory viewer should open showing the contents of that folder. If you don’t the shared folder should still appear on your iconbar, but you can open it when you need it in the usual way.
So, here is the folder used for this guide, as seen from RISC OS – containing all the screen grabs used in this post: